Saturday, November 5, 2011

The Good, the Bad, and the Sad.

I woke up this morning and what did I see? Snow was falling all around me! November has brought me such a nice surprise, white flakes falling right before my eyes.

Needless to say, I adore the snow. There's something about it that just makes me want to hug people and be happy.

So when I saw this when I walked upstairs this morning:


I couldn't be happier.
Crappy photo quality but you get the idea. It's snowwwwww! Yaaayyy! That means maybe I can go sledding soon!

But, it also is one of the most destructive things nature has to offer. It collapses, buildings, roofs, causes car accidents, and the saddest of all, this morning it killed one of my best childhood friends. He was already in the end of his years, but my family was preserving him as best as we could. So his death was devastating.
The snow killed my cherry tree.

 Again, sorry for awful photo quality. These were taken through windows because I was wearing a t-shirt and boxers this morning....

Anyways, losing friends is hard. Especially ones as faithful as a good old cherry tree.

Friday, November 4, 2011

I'm in love.

Yes, I've fallen hard. Upon first glance, I knew we were destined to be together. 

I've bought new polish.


You like?

Thursday, November 3, 2011

Wee little business suits

THESE ARE SOOOO FREAKING CUTE.
*cough* sorry, had a cute attack there. 
I la-la-la-la-LOVE them.

Sorry for crappy photo quality. Yes, my camera is on macro, it jsut still kinda sucks but you get the idea right?

Yeah they're adorable.

Step 1: Prep your nails, of course. Clip and file them, and push back your cuticles. For a long time I didn't understand the benefit of pushing back cuticles but my nails look sooooo much better after I push them back.
Step 2: Choose your colors. I used a tan for the base, white, black, and different colored pastels for each tie, but if you want to do the same color tie or different color jackets/shirts or whatever it's up to you.
Step 3: Apply your base color. Again, I used tan.
Step 4: Paint wee little triangles with your "shirt" color next to your cuticle. I used white, as shown here. 
Step 5: Paint the "collars" using black. Do this by outlining the white with a small paint brush, and extend the lines a little bit past the point going either way. Then do lines just outside of those that line up with the ones you just painted. This is the one step that you actually have to use the color I did or it will look really funny. 
Step 6: Paint the ties. These are just little squares that overlap.
Step 7: Pick up the smallest amount of black possible on a very tiny brush and outline the ties. Simple enough.


Step 8: Using a dotting tool or a straight pin shoved into a pencil, put little dots or whatever sort of pattern you want on the ties. Dots are the easiest if you're lazy like me. :)
 
Step 9: Paint a very faint and thin line going down from the bottom of the collar, and use a dotting tool to create buttons.

Final Step: Apply top coat and you're done! 

I have another little design to show y'all now, but it's kind of crazy difficult to do a tutorial on so you just get to see the AWESOME result.
And the thumb? 

I LOVE THESE.
I also have new hair.

IT LOOKS LIKE THIS WITHOUT STYLING.

I'm the luckiest girl in the world.


That's all folks!


Sunday, October 30, 2011

The Lovely Month of October

This isn't a nail post.
I figure I should use this as a normal blog too.
This October has been the best one EVER for more reasons than I can even list, I'm just loving life and all of the people in it. Let's meet some of them.
These are two of my very best friends. They're always there for me to talk to about anything and always have my back. Always always always.
That's Kaelyn. Isn't she pretty? And doesn't she have beautiful hair?

This is Raelyn, and this picture captures her personality perfectly. She loves food and her iPod and is just pure insane. That's why we love her.

I'll have more friend-pictures up sometime, but I don't have any on my camera right now.

All you other friendies, don't be offended, you'll be on here soon. (=

What made this month the best one I've ever lived was the GAP Program. GAPP stands for German-American Partnership Program and is a once in a lifetime experience for bot the Americans and the Germans. Through this program, every 2 years 20-30 practically perfect people from Einbeck, Germany are sent to Ogden and Roy High Schools to stay with students here.

I had the chance to host a wonderful girl named Alex/Sunny/Alexandra, and she was the best ever. I still miss her and it's been a few weeks, I sure hope I get to go see her in June. (=

Also, one of my passions, marching band, competed amazingly this year. We experienced more adversity and had more people quit than probably every other year put together, but all of the people who stayed were all passionate about the band and the competition of all of it. Even though sometimes every body wanted to quit out of frustration, we all worked together and pulled through and had amazing results. We took first at every competition except for one, the music caption at every competition, percussion caption at 3 competitions, colorguard was completely undefeated and best of all....

WE TOOK STATE!!! :D :D :D
 As did our subcategories of colorguard and percussion. We're buttkickers. :D

That's all folks, good night! 


Saturday, October 29, 2011

Connvveeerrrrsseee!

I love these. They're my favorite.

Actually, I dunno if they're my favorite, but I do really like them.

You don't have to use these same colors, but as a base I used Blazed from Wet'nWild's Wild shine collection. The other colors I used were White On from Sally Hansen's Xtreme wear collection, Black on Black by Sinful Colors, and LA Color's Art Deco silver striper.

I apologize for crappy photo quality, my camera's being a jerk.

First, paint your nails with whatever color you want the sneaker to be. Use enough layers to get it opaque, otherwise the shoes will look weird and translucent and just... Weird. So make them opaque.

Next, use the silver striper to paint the tip.

The next step reminds me of lightbulbs. Use a black striper or a tiny paintbrush and black to paint a curved line through the silver, then curved lines from the end of the first line going up toward the cuticle. You'll see what I mean in the next picture.
Next, use a white striper or white polish and a tiny paintbrush to paint laces. This is actually more difficult than it sounds, but you can do it! Paint x's going from either side of the black lines that go toward your cuticle, as shown here.

Last but not least, use a dotting tool (Pardon my ghetto version) to do little loops that the laces go through.

(This isn't the greatest picture, but that's a straight pin shoved into a pencil. But it works just fine if you don't want to put out those extra few dollars to go buy a dotting tool.)

Apply a topcoat and you're done! I used number 110 Sally Hansen Insta-Dri, which definitely lives up to its name. After putting this on a super wet design, it'll be dry within a couple of minutes.

It's fantastic.

Sunflowers

First tutorial! :D


I kind of love these.

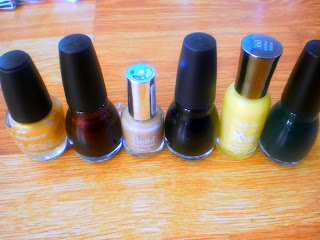
First thing you're going to want to do is choose your colors. Of course. I used Seashell by LA Colors as a base/some of the leaves, and it's a really nice gold-y color. The alternating yellow color, the more bananaish one, is Mellow Yellow by Sally Hansen from their X-treme wear collection. The seeds are Mercury rising by Sinful Colors, Black on Black by Sinful Colors, and Barefoot by Bonita. The leaf is Last Chance by Sinful Colors.


In order from left to right: Seashell, Mercury Rising, Barefoot, Black on Black, Mellow Yellow, and Last chance.

First off, paint all of your nails with the gold color. Make sure to use enough coats to get it completely opaque. This will be the dominant color of your design. Next, use black nail polish and a tiny paint brush to paint a curved line at the upper corner of your nail near the cuticle. Using the same paint brush, paint another curved line near your cuticle that comes out from the side of the first line and curves upward toward your cuticle. This is your first petal. Follow this same technique to create the rest of the petals.

Use the same paint brush and the same black to paint tiny circles (hollow ones, don't fill them in)  inside of the first half circle near your cuticle. These will be your seeds. Fill in 2 or three of the seeds with black.

Use the dark brown and tan to fill in a few more of the seeds, but leave a few of them yellow as well.

Take your lighter banana-yellow and fill in alternating petals. Leave the other ones gold.

On the end of the petals, use black to paint a leaf, and fill it in with dark green. Use black to paint a small line that goes from the petals outward. Clean out the tiny brush you've been using. Pick up the smallest amount of black possible on the very very tip of it and paint faint lines on each petal that go from the inside out.

You can do this same thing on every nail, or just pick one or two to do it on. I only did it on my big toe, and for the rest I used the dark brown and black to do thin stripes that are very close together to mock the seeds of a sunflower.

I hope you love this design as much as I do, have fun with it!

Let's get started!

Now that' you're here, you might wonder what you have clicked on. It's nothing special, just a little blog that I started for all of you other nail art buffs out there, or those of you who just like cool stuff.

I've only been doing this for a little while but I like to think I do some pretty cool designs, which I'll post pictures of and instructions (maybe videos later) for.

I have 54 bottles of nail polish and an acrylics kit, and nearly every time I come home my mom has bought something new.


 I couldn't even get all of them into one decent picture.

That's all, keep following to see some SUPER cool designs. (=