 THESE ARE SOOOO FREAKING CUTE.
*cough* sorry, had a cute attack there.
I la-la-la-la-LOVE them.
Sorry for crappy photo quality. Yes, my camera is on macro, it jsut still kinda sucks but you get the idea right?
Yeah they're adorable.
Step 1: Prep your nails, of course. Clip and file them, and push back your cuticles. For a long time I didn't understand the benefit of pushing back cuticles but my nails look sooooo much better after I push them back.
Step 2: Choose your colors. I used a tan for the base, white, black, and different colored pastels for each tie, but if you want to do the same color tie or different color jackets/shirts or whatever it's up to you.
 Step 3: Apply your base color. Again, I used tan.
 Step 4: Paint wee little triangles with your "shirt" color next to your cuticle. I used white, as shown here.
  Step 5: Paint the "collars" using black. Do this by outlining the white with a small paint brush, and extend the lines a little bit past the point going either way. Then do lines just outside of those that line up with the ones you just painted. This is the one step that you actually have to use the color I did or it will look really funny.
  Step 6: Paint the ties. These are just little squares that overlap.
 Step 7: Pick up the smallest amount of black possible on a very tiny brush and outline the ties. Simple enough.
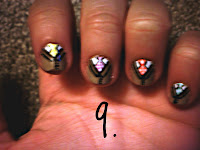
Step 8: Using a dotting tool or a straight pin shoved into a pencil, put little dots or whatever sort of pattern you want on the ties. Dots are the easiest if you're lazy like me. :)
Step 9: Paint a very faint and thin line going down from the bottom of the collar, and use a dotting tool to create buttons.
Final Step: Apply top coat and you're done!
I have another little design to show y'all now, but it's kind of crazy difficult to do a tutorial on so you just get to see the AWESOME result.
And the thumb?
I LOVE THESE.
I also have new hair.
IT LOOKS LIKE THIS WITHOUT STYLING.
I'm the luckiest girl in the world.
That's all folks!


